FastStone Image Viewer

FastStone Image Viewer is a freeware for home users (commercial usage would require a license), which I highly recommend for photographers looking for a lightweight software for image culling and selection.
Key Features of FastStone Image Viewer
The full list of features available in FastStone Image Viewer can be viewed on their official website here, but here are the key features that I really appreciate and think that it would help your workflow too, regardless if you’re just starting out or shooting professionally.
- The software is lightweight, and a portable version is available for instances where installation is not possible or you want to keep your registry clean.
- Batch rename and batch conversion (for resizing or watermarking) is possible, and with the newest version, batch rename templates can be saved as well.
- Basic edits such as cropping, resizing and rotating are easy and straightforward.
- Simple On/Off tagging system together with numbered (1~5) rating system helps with image selection and culling.
- Ability to read the embedded image previews of a variety of raw files, and even if new models are released updates are usually not necessary (until someone decides to change the RAW encoding of image previews)
- Images are viewed full screen with minimal distractions – moving the mouse around to the monitor edges brings out the various fly-out menus when necessary.
Quick Tips on Setting Up
Here are some settings I find important to check and set properly when using it as a tool for image culling.
- Under the menu items “Tag” and “Rating”, make sure “Enable File Tagging” and “Enable File Rating” are checked and enabled.
- Next press “F12” or go to settings under the “Settings” menu item, and check these following settings:
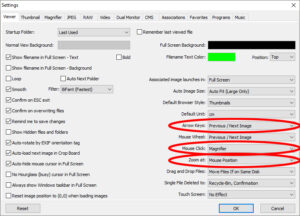
This settings would allow you to use your arrow keys and mouse scroll wheel to go through the images, and by left clicking the mouse or pressing the “1” button you can zoom to 100% at where the mouse cursor is placed to quickly check for critical focus.
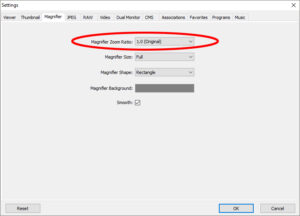
By setting the zoom ratio to 1.0x it is easier to check for critical focus – the default 2.0x magnification sometimes make images look softer than the really are.
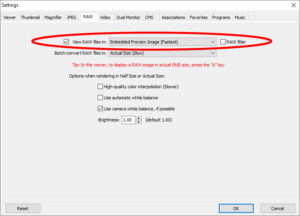
This is the default setting, but just make sure it is set to use the embedded image preview for faster operations.
Limitations and Things to Take Note
While I like this software a lot, it is good to remember that it is an image viewer first, so its editing abilities beyond cropping and resizing (such as brightness, contrast or color adjustments etc.) are really basic and I would recommend using a more specialized software for such operations.
And although it views the embedded image previews from RAW images largely without hiccups, trying to convert a RAW image to JPG would usually yield incorrect, if not strange, results. This is not a RAW converter, so you would be better off using a proper RAW converter for such operations.
Final Note
Definitely give this software a try by heading over to their download page, and if you are not comfortable with my settings for zooming and shifting through images, definitely try to play around with the magnifier/mouse zoom settings to find a culling workflow that works for you!
And if you like the software, do consider giving a thumbs up to the developers by giving them a small donation via their website!